[vc_row][vc_column][vc_column_text]CTI, or computer telephony integration, is a key element of the customer service center automation strategy. Amazon Connect integration will allow Salesforce CSR/Agent to receive calls or call customers from within Salesforce UI. Agents can click to dial instead of spending precious time typing numbers for each call. And while receiving a call the caller information pops up on the screen and opens the related contact record to provide the receiver with a description of the caller and previous calls or issues.
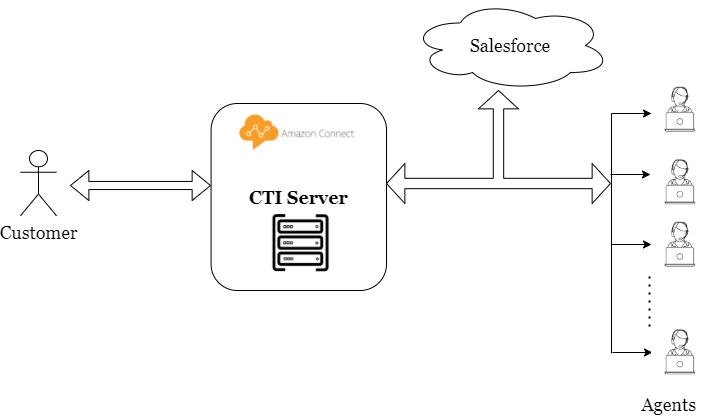
Steps for Amazon Connect Integration
Create an Amazon Web Services (AWS) Account
If you already have an AWS account, scroll to the bottom of this page and click Verify Step. If you don’t have an account, follow the below steps. You need the following to set one up.
- Personal email address (don’t use an email address associated with your employer)
- Personal credit card (Amazon Connect provides a free tier. Additional usage incurs standard fees for Amazon Connect.)
- Personal phone number, to confirm your account signup
We recommend that you use personal assets—email address, credit card, and phone—instead of assets provided by your employer for this project. If you want to use employer-provided assets, check your employer’s policies first to make sure you’re in compliance.
Sign Up for an AWS Account
- Visit https://aws.amazon.com/
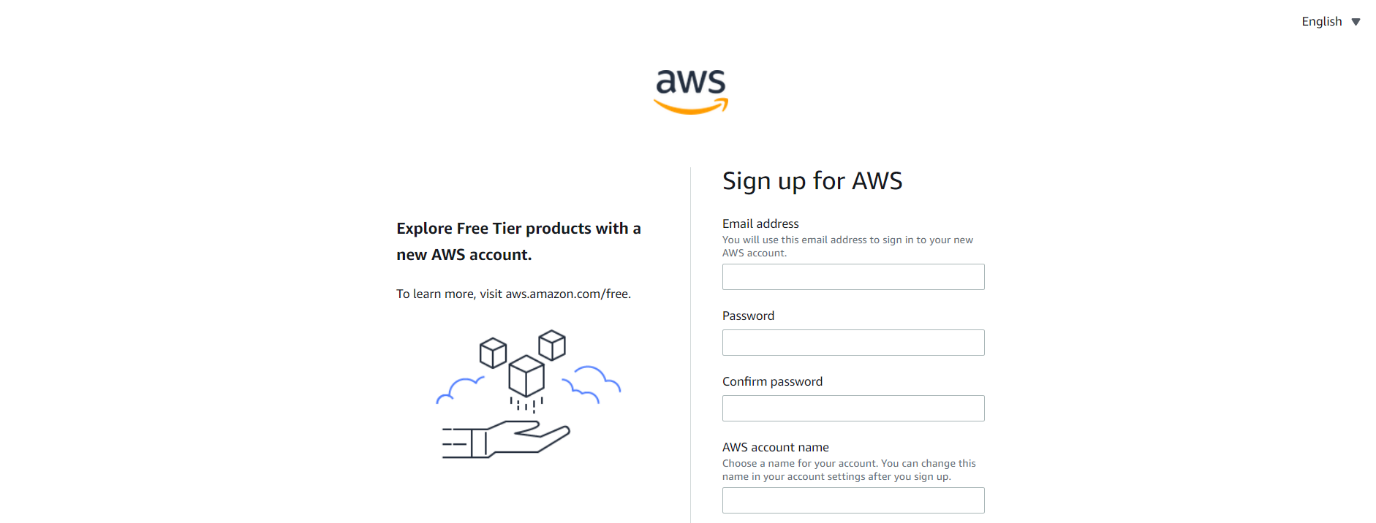
- In the upper-right corner, click Create an AWS Account.

- Complete the below form and click Continue.
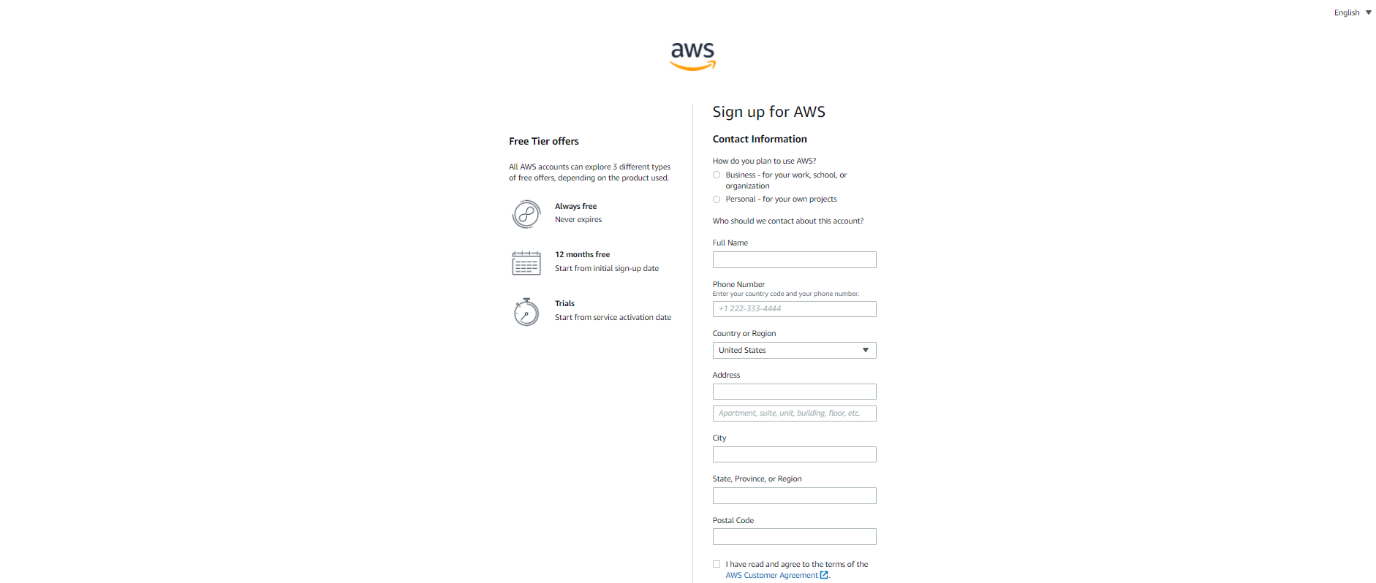
- Select Personal and fill in your contact information.Note, when you set up an AWS account with an address located in India, it automatically gets registered under Amazon Internet Services Private Limited (AISPL). Amazon Connect isn’t available for AISPL accounts. To get around this, you can set up an account with a United States-based address.
- Provide the payment details on this screen.
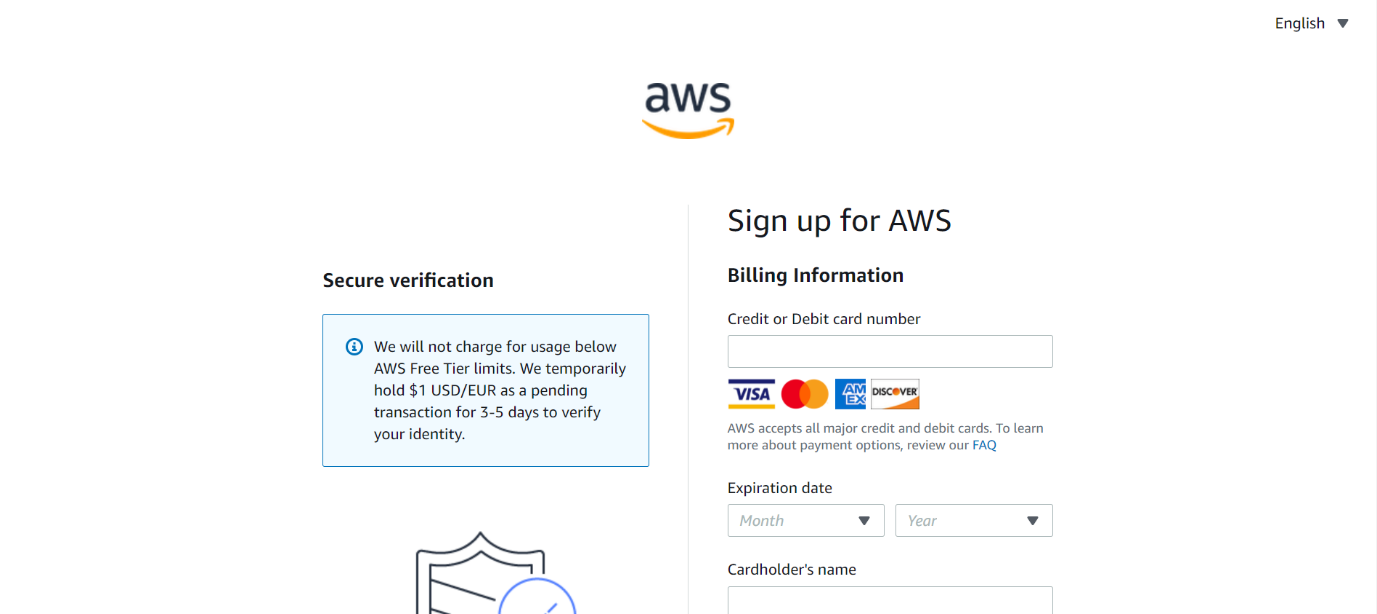
- Complete the Verification Process
- Select Text message(SMS).
- Enter your phone number and the security check characters, then click Send SMS.

- Enter the code you received on your mobile phone, then click Continue.

- Wait a couple of minutes for account creation to complete on the back end, then click Sign in to the Console with the email address you used for your account. Your email and password you just set up becomes your Root User login credentials.
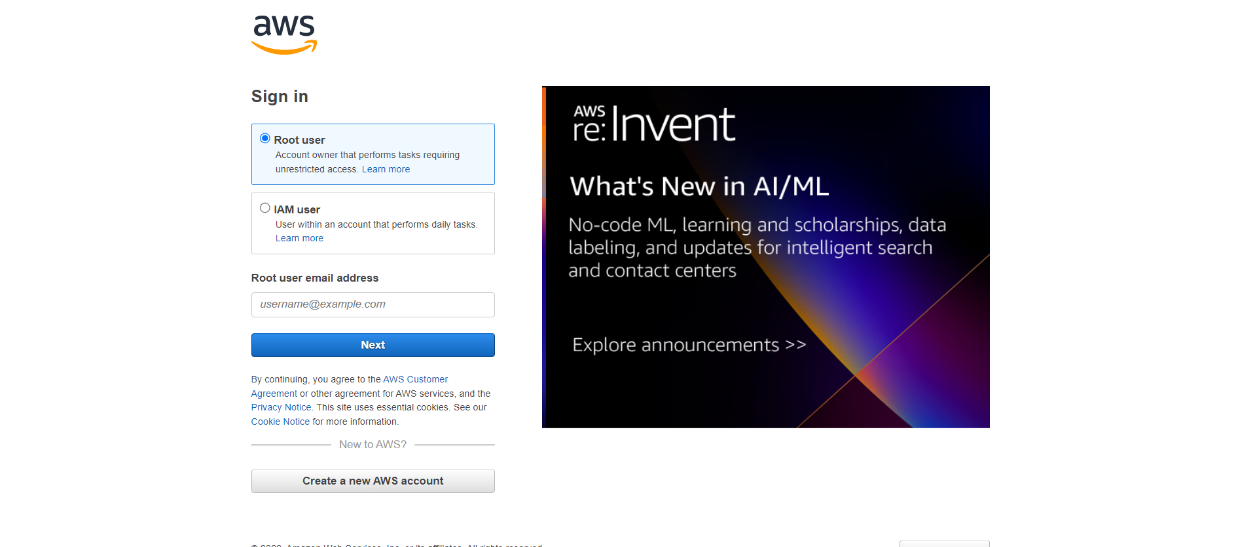
Create an Amazon Connect Instance
Set Up Your Amazon Connect Instance
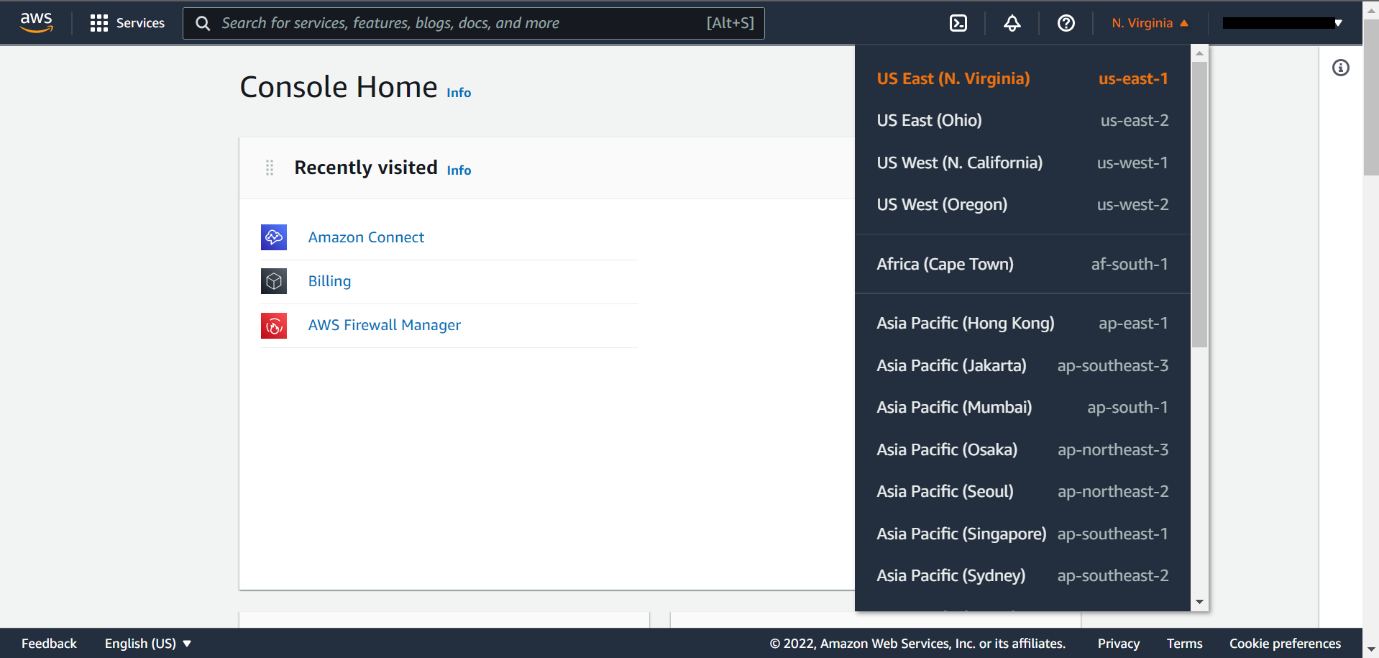
- Check your region at the top of the console. Amazon Connect isn’t available in all regions. To make sure Amazon Connect is set up correctly, select US East (N. Virginia) from the region dropdown at the top of the AWS Management Console after getting started.
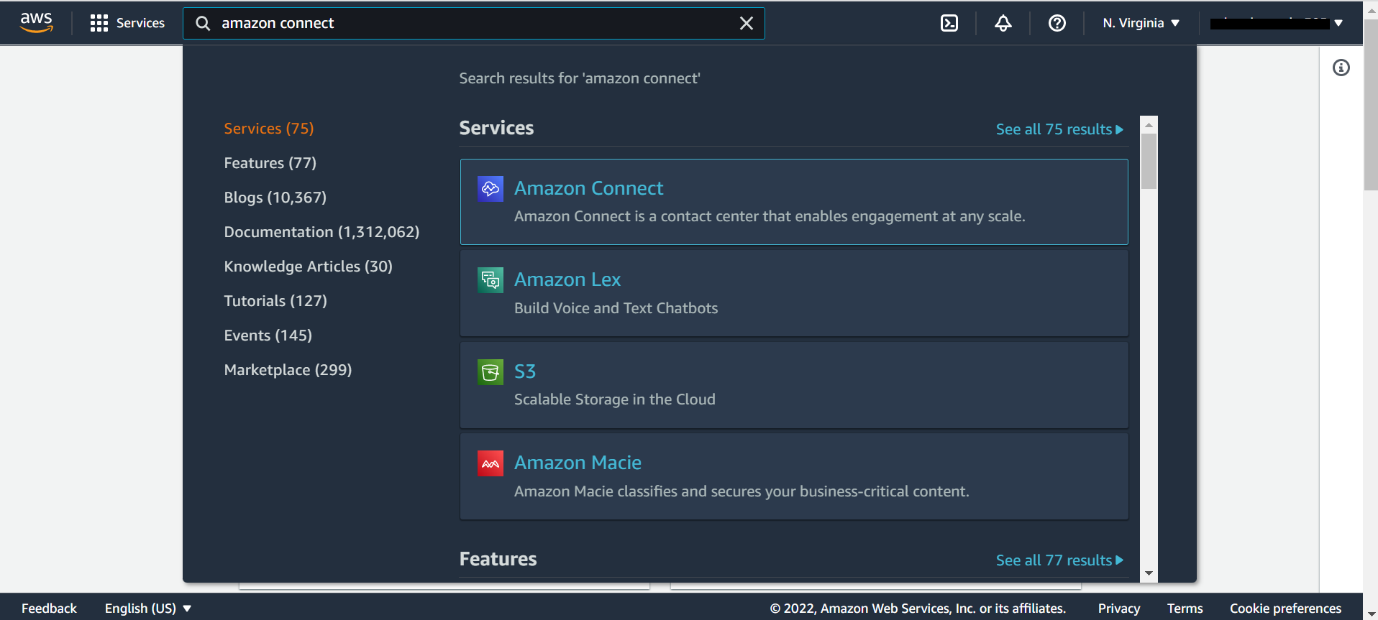
- Enter amazon connect in the Find Services search bar (1). Then click on Amazon Connect (2). You can also find it by expanding the All Services section and scrolling to the Customer Engagement category.
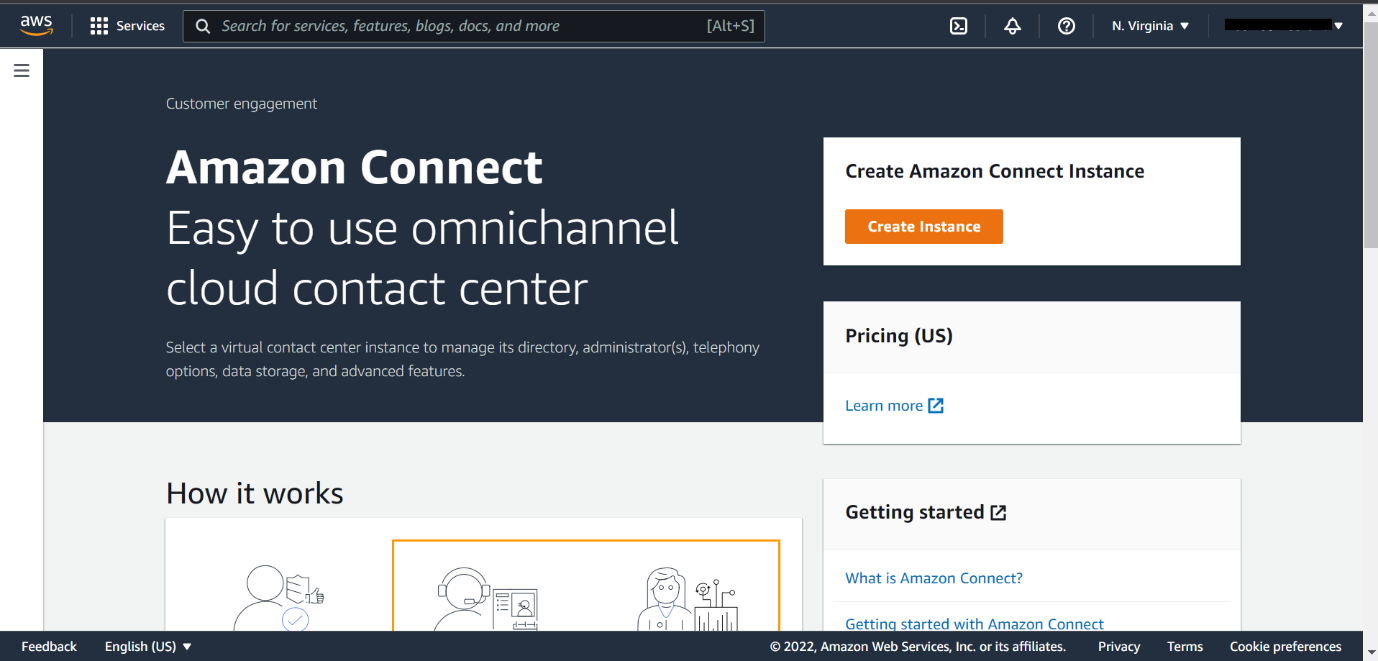
- Time to start setting up your instance.
- If this is your first time creating an instance, click Get started.
- If you already created an instance, you’re taken to a list of your instances. Click Add an instance.
- On the Identity management page, make sure Store users within Amazon Connect is selected.
- In the Access URL field, enter a unique value. This value becomes your instance name.
- Store your Access URL in a safe place. You need it later in the project.
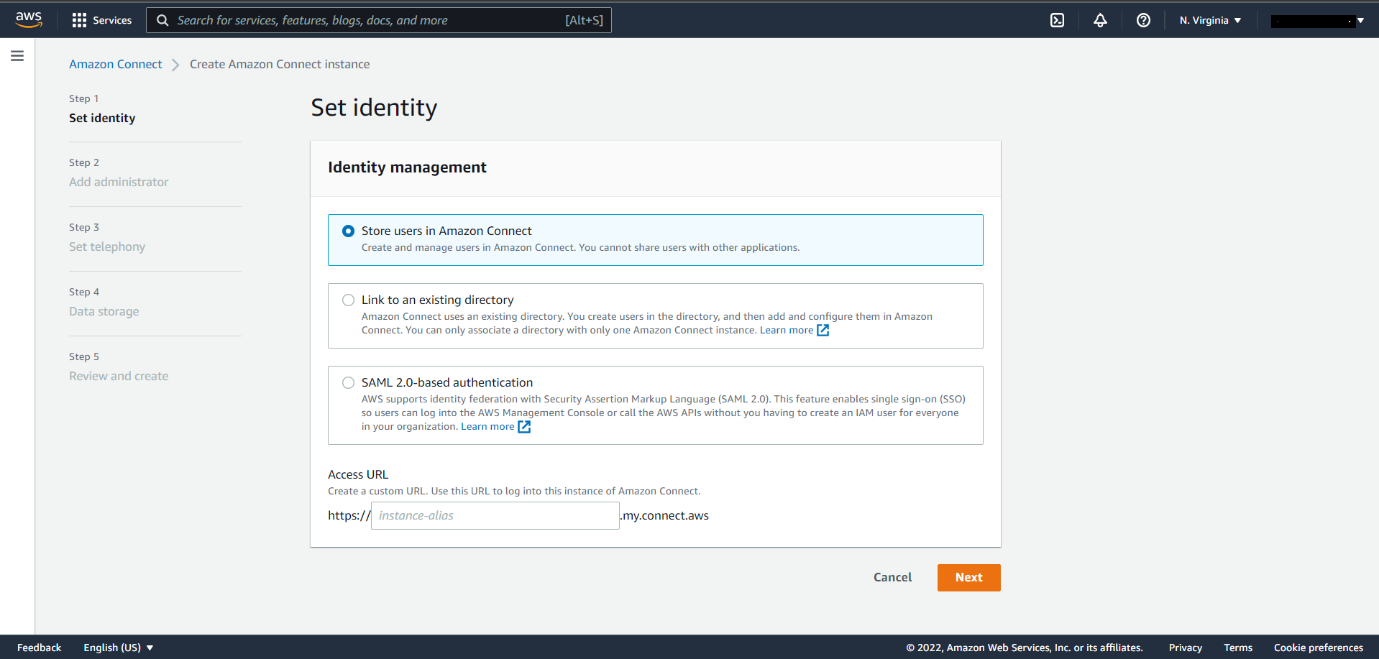
- Click Next.
- On the Create an Administrator page, make sure Add a new admin is selected.
- Complete the form to create your admin account. Store the admin username and password in a safe place. Then click Next
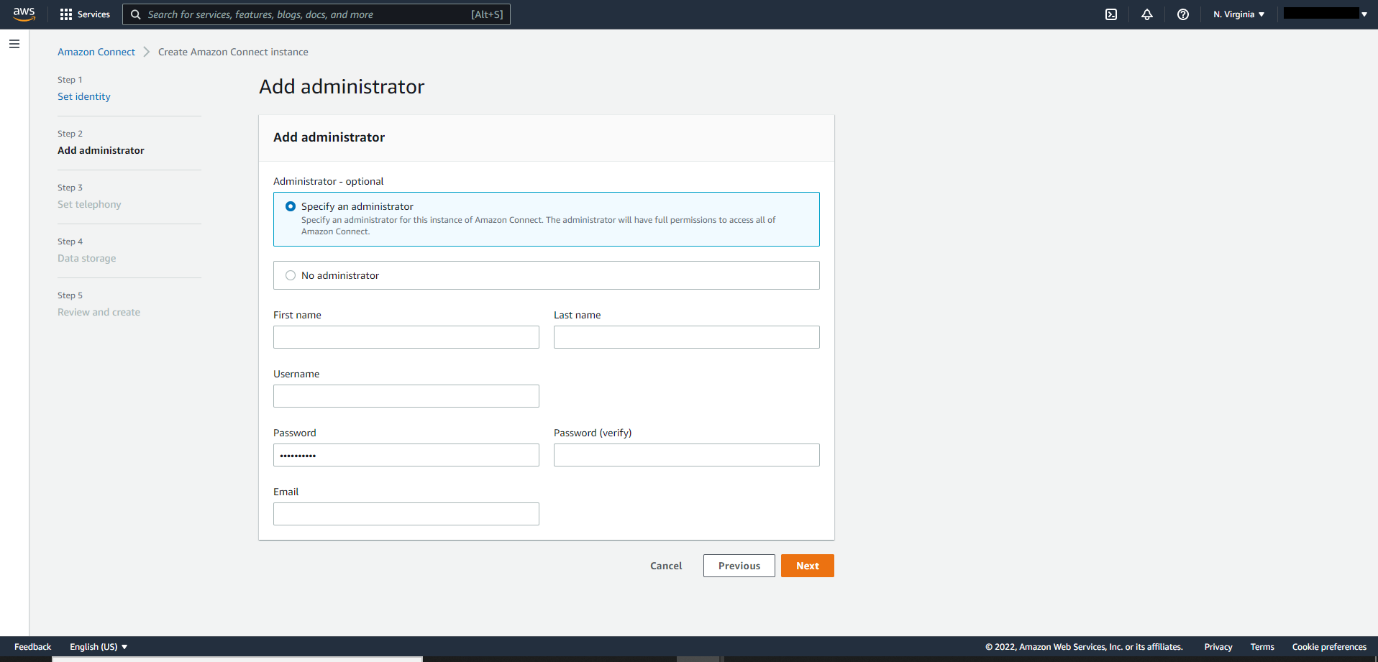
- On the Telephony Options page, check the boxes for both Incoming calls and outgoing calls, then click Next.
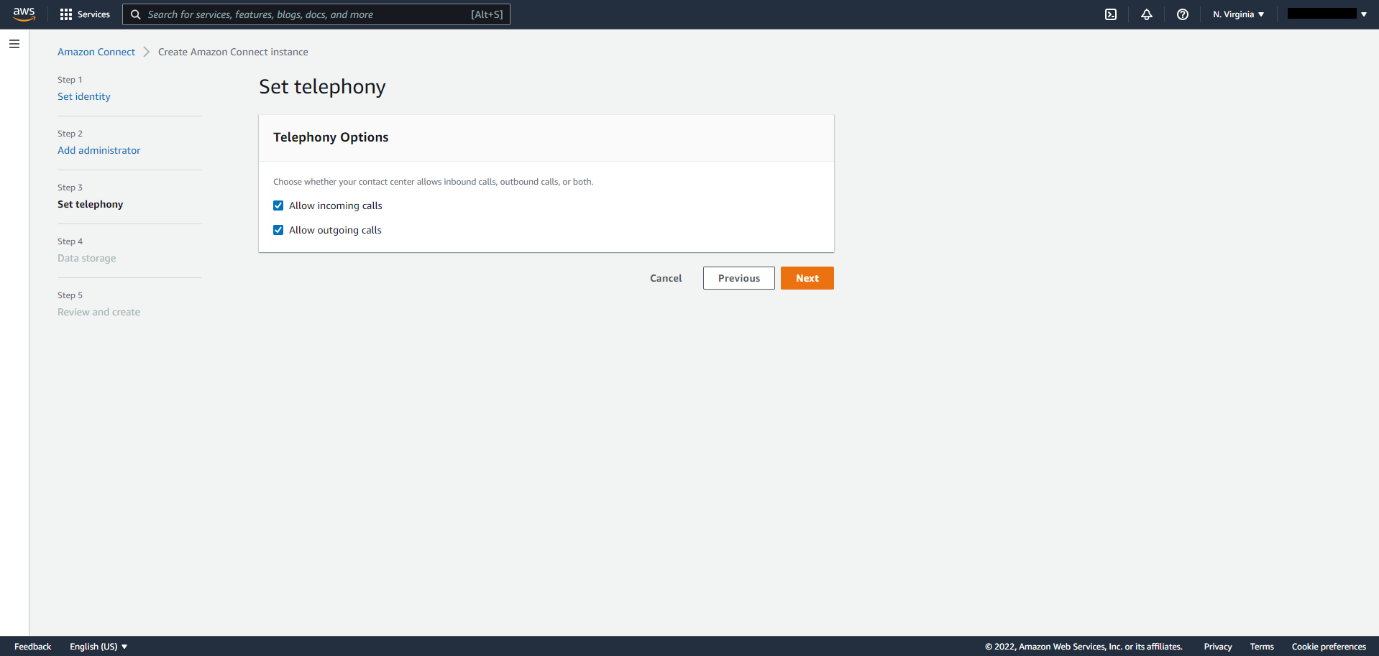
- On the Data Storage page, click Next.
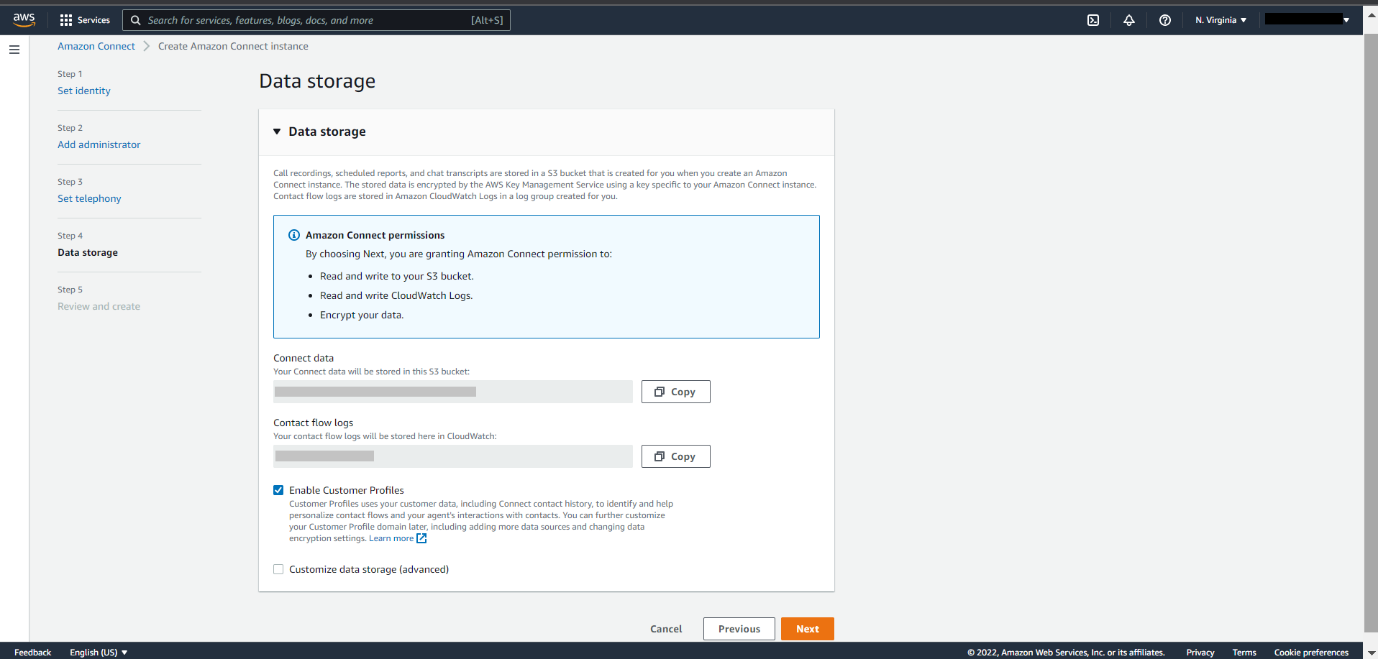
- Review the information on the Review and Create page. This is a good time to double-check your Access URL and administrator name matches your notes. Then, click Create instance.
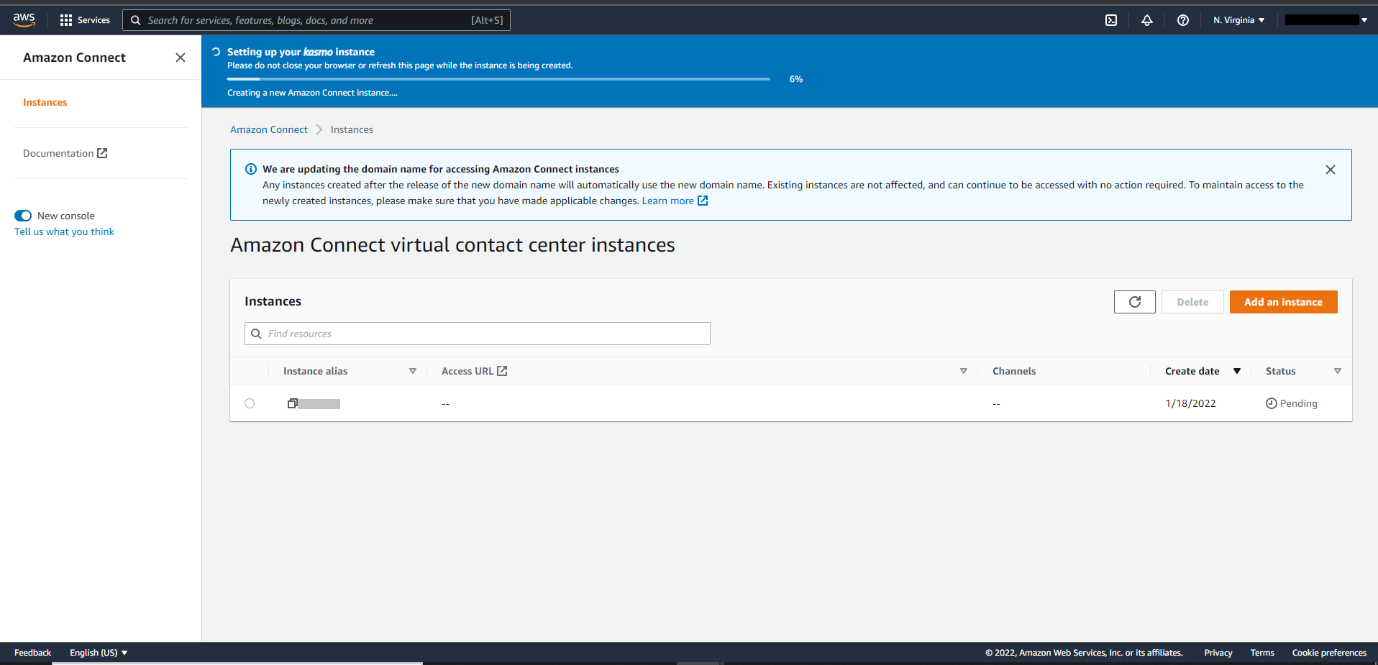
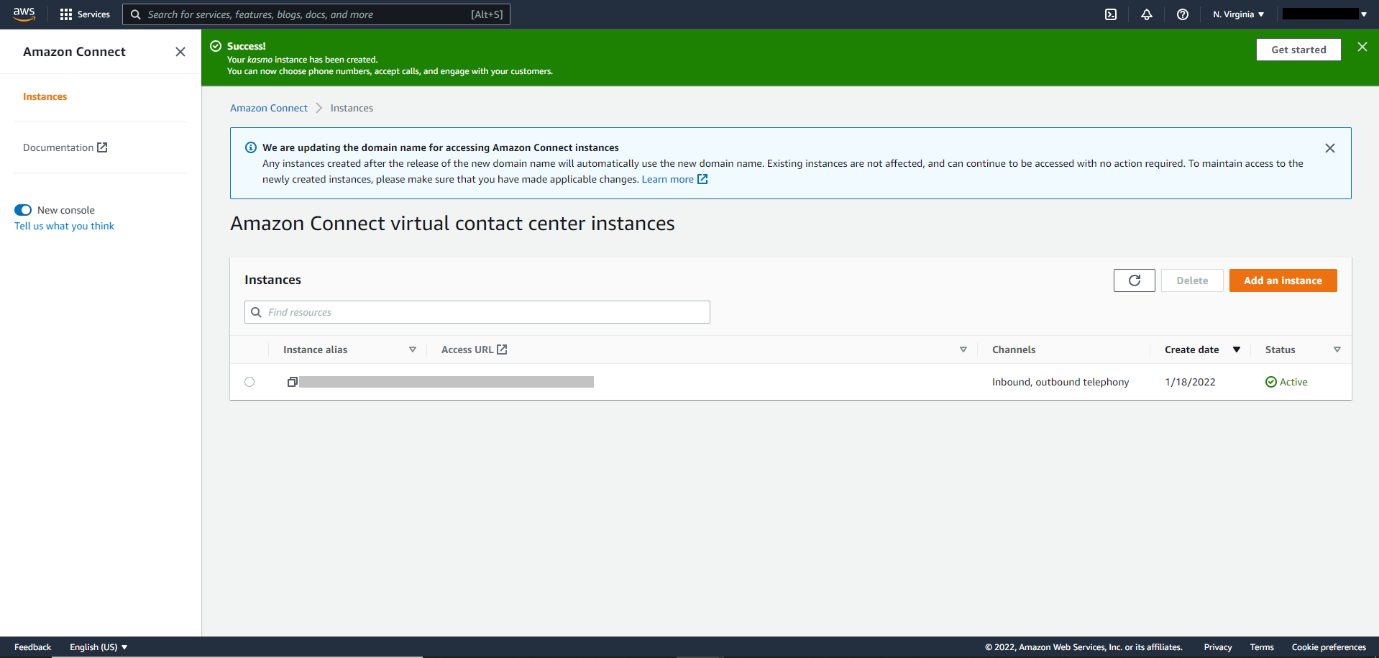
In a minute or two, you’re able to start using your Amazon Connect instance. You’re taken to a Success screen with a Get started button.
Configure Your Amazon Connect Instance
Time to configure a few options and then test the instance to make sure everything works.
- Click Get started. You’re directed to your Amazon Connect instance in a new tab. Notice, the URL is your access URL.
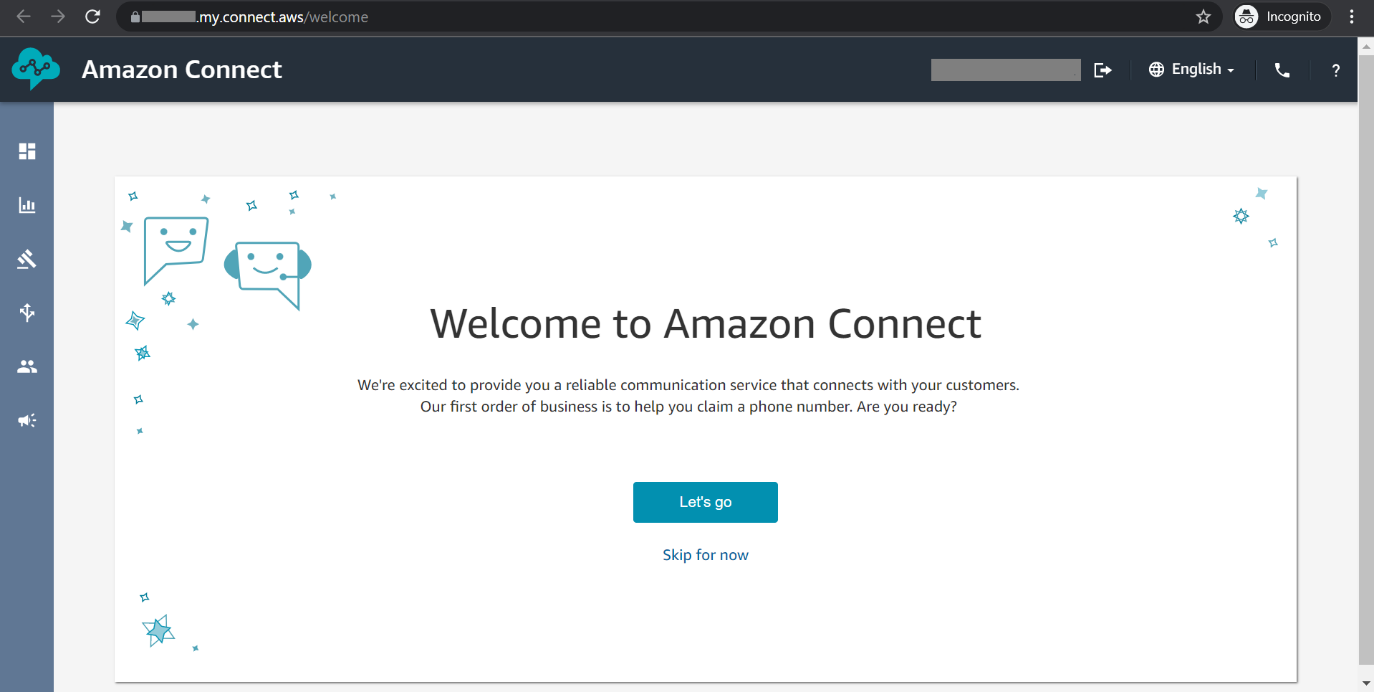
- Since it’s your first time in this instance, you’re greeted by a welcome message. Click Let’s go. You need a phone number to make use of Amazon Connect’s features, so you’re presented with a couple of options to select from.
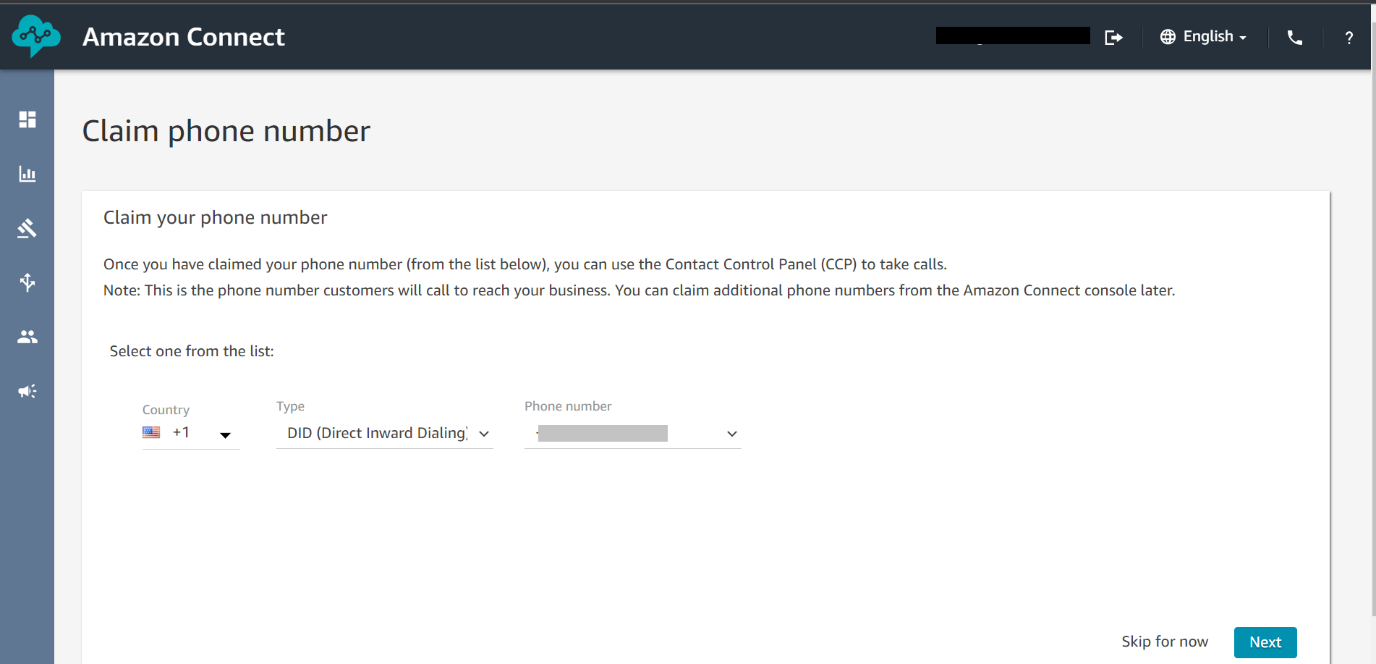
- For the purposes of this project, select United States +1 from the Country dropdown.
- In the Type dropdown, make sure DID (Direct Inward Dialing) is selected.
- Select a number from the Phone number dropdown. Write this number down. You need it later in the project. Know that your phone number is free for a specific period of time. At the end of this project, you release this number back to AWS to avoid charges after the free period is finished.
- Click Next.
If your browser asks to use your computer’s microphone, go ahead and allow access. Time to test your new instance.
Test Your New Instance
You can now make inbound and outbound calls. If your browser asks to use your computer’s microphone, allow access.
On the Claim phone number screen, you see the Contact Control Panel (CCP).
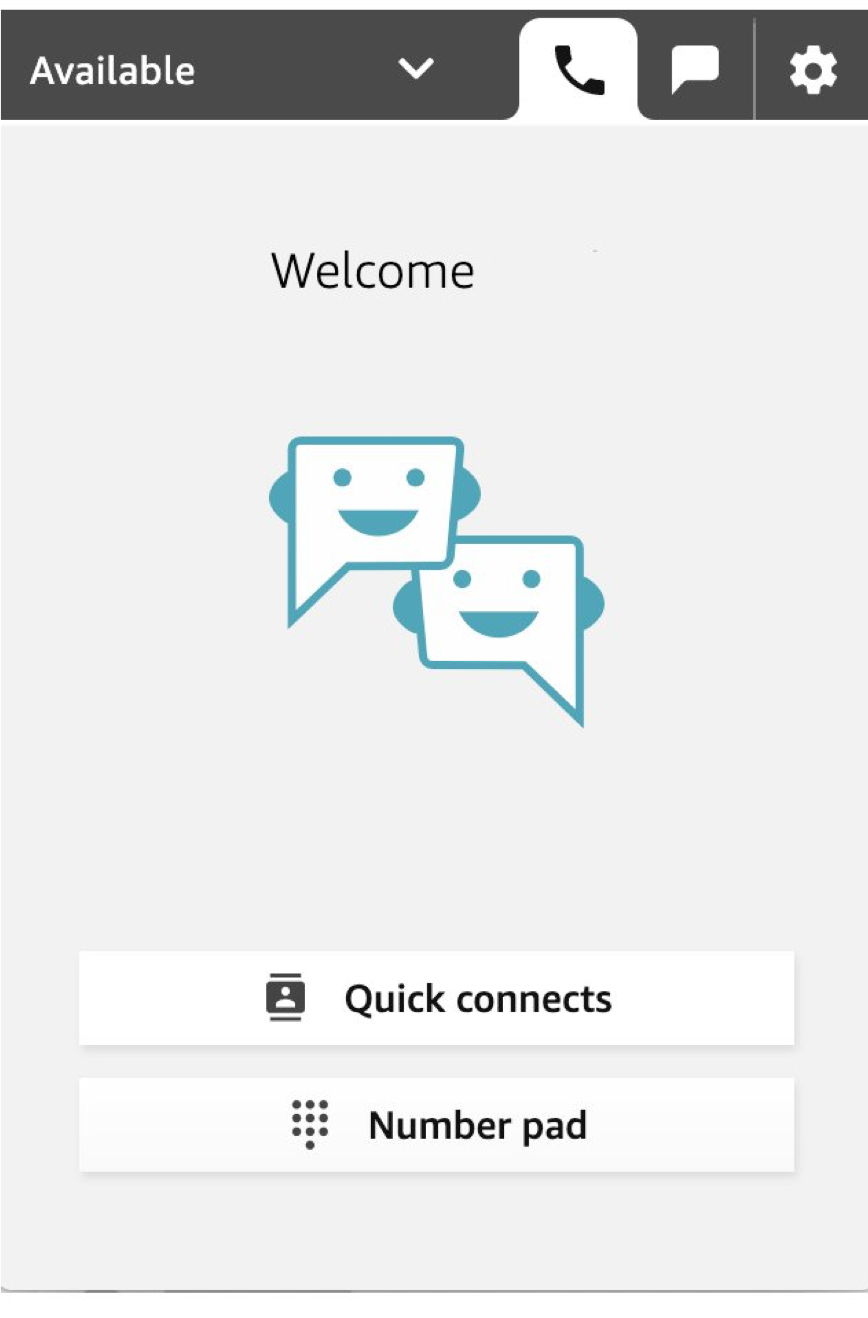
Test your calling capabilities. Note, it may take some time for the number you claimed to be ready for testing. If you’re unable to test following the instructions below, wait a few minutes and try again.
- Make sure your agent state is set to Available.
- Click the disclosure arrow at the top of the CCP.
- Select Available.

- Use another phone to call the number you claimed.
- Dial the number you set up above.
- When the voice prompts, press 1 for an agent.
- Press 1 to move to the front of the queue.
- Press 1 once more to be connected.
- Your Contact Control Panel indicates that your call center is receiving an incoming call. Click
 to accept the call.
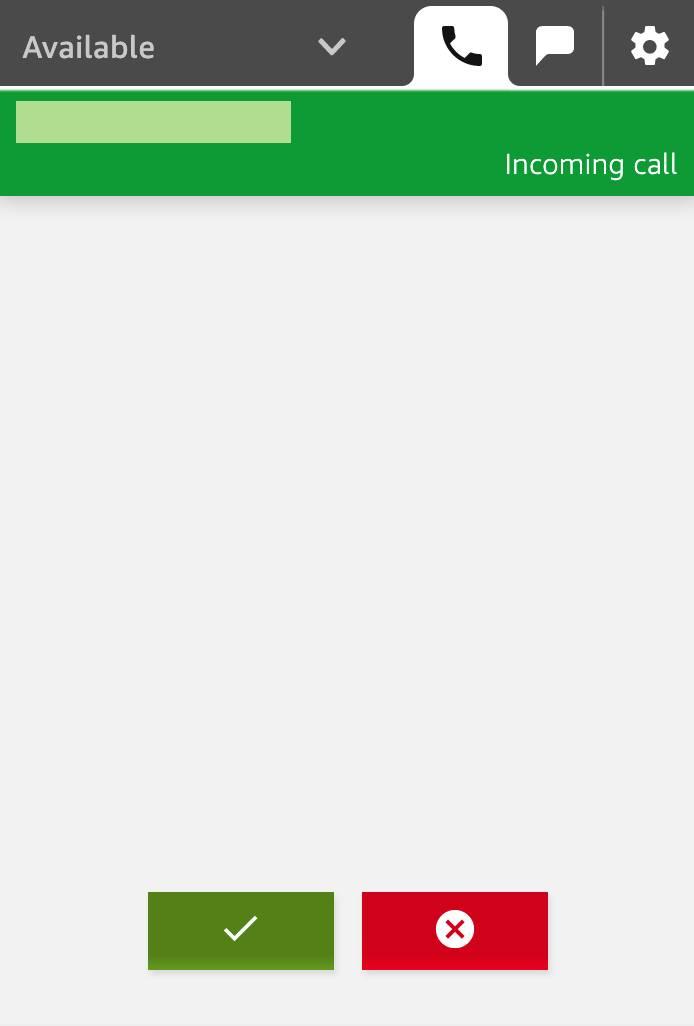
- Then, click End call. The Contact Control Panel switches to the After Call Work mode, which gives the agent time to finish up tasks.
- Click Clear contact.
Congratulations! You’ve completed your first call. Now, let’s try an outgoing call.
- Click Number pad.
- Enter a phone number where you receive calls, then click Call.
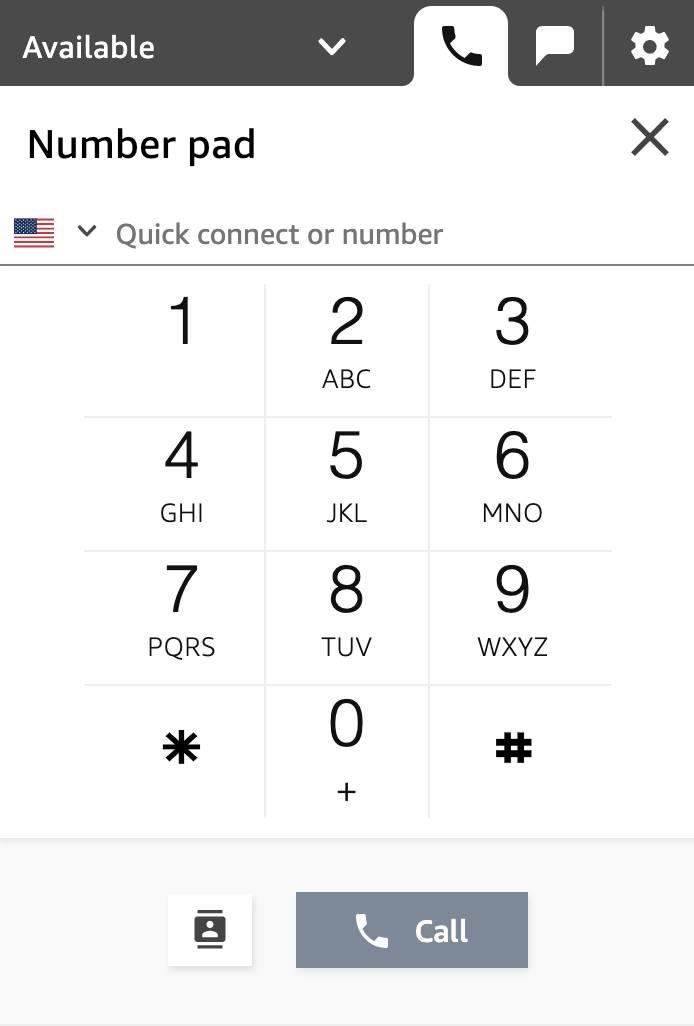
- When your phone rings, answer it. You can then hang up your phone or click End call in the Contact Control Panel.
- Click Clear contact.
Great, testing is complete!
Create an Additional Agent Profile
You have just a few more steps to fully configure your Amazon Connect instance. You’re going to integrate with Service Cloud soon, so it helps to create additional agents in Amazon Connect so they’re ready to be used in Salesforce.
- In Amazon Connect, click
 in the left navigation, then click User management.
 - Click Add new users.
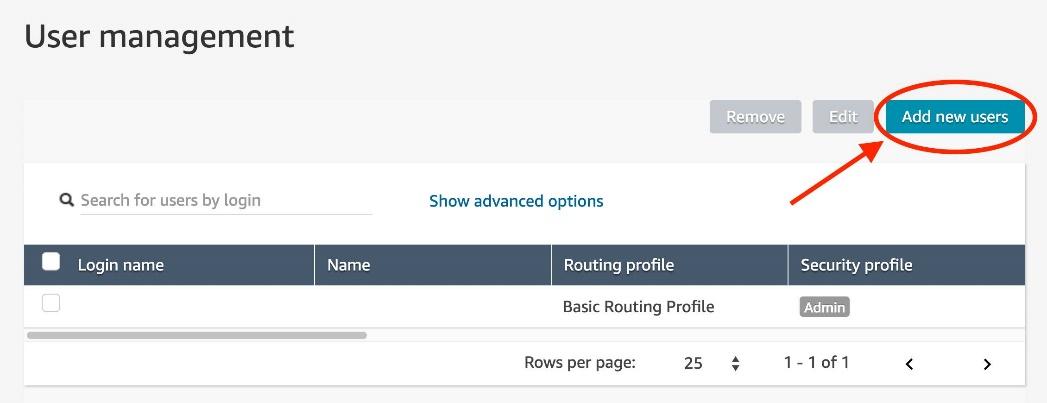
- Make sure Create and set up a new user is selected, then click Next.
- Add user details. Choose a login name and password that are different from your Amazon Connect admin account. Write down this agent login name and password, as you need that information in the next section.
- Your agent’s password should be at least 8 characters with an uppercase letter, a lowercase letter, and a number. Amazon Connect won’t allow you to save the user without meeting this criteria.
- For Routing Profile, select Basic Routing Profile.
- For Security Profiles, select Agent.
- For Phone Type, make sure Soft phone is selected.

- Click Save.
You just created an agent in Amazon Connect. Now the agent can log in from the Salesforce Service Console once the integration is complete!
Install the Amazon Connect CTI Adapter
Amazon Connect CTI Adapter for Salesforce
The world of telephony has changed significantly over the past decade. What used to take months to install, months to configure, and months to roll out can now be done in a fraction of the time. And it’s only going to get easier.
The Amazon Connect Computer Telephony Integration (CTI) Adapter for Salesforce is one such example. It’s a simple process to receive incoming calls and make outgoing calls right from Salesforce. CTI Adapter provides a browser-based contact control panel (CCP) within the Salesforce Lightning, Console, and Classic CRM experiences. This feature includes both inbound caller ID screen pop-ups and outbound click to call/transfer/conferencing.
Launch Your New Trailhead Playground and Install the CTI Adapter
Time to open your Trailhead Playground and install the CTI Adapter. Scroll to the bottom of this page, select your new Trailhead Playground and click Launch. If you see a tab in your org labeled Install a Package, great! Follow the steps below.
If not, click  to launch the App Launcher, then find and click Trailhead Starter and follow the steps. If you don’t see the Trailhead Starter app, copy this AppExchange link and check out Install a Package a App to Complete a Trailhead Challenge on Trailhead Help.
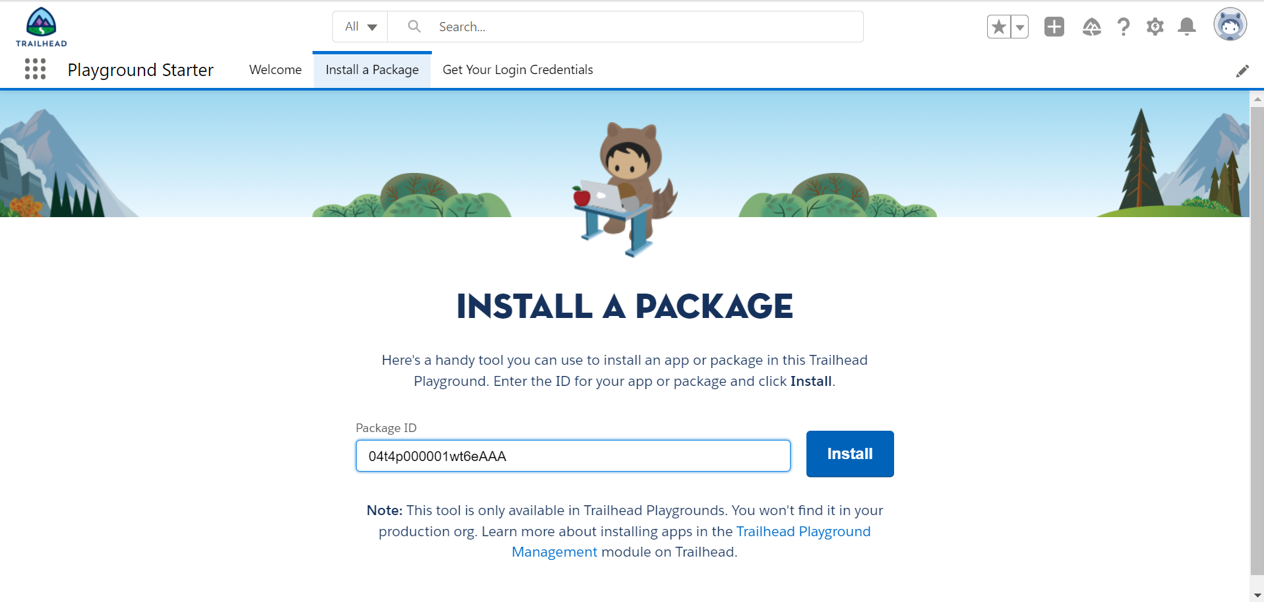
- Click the Install a Package tab.
- Paste 04t4p000001wt6eAAA into the field.
- Click Install.
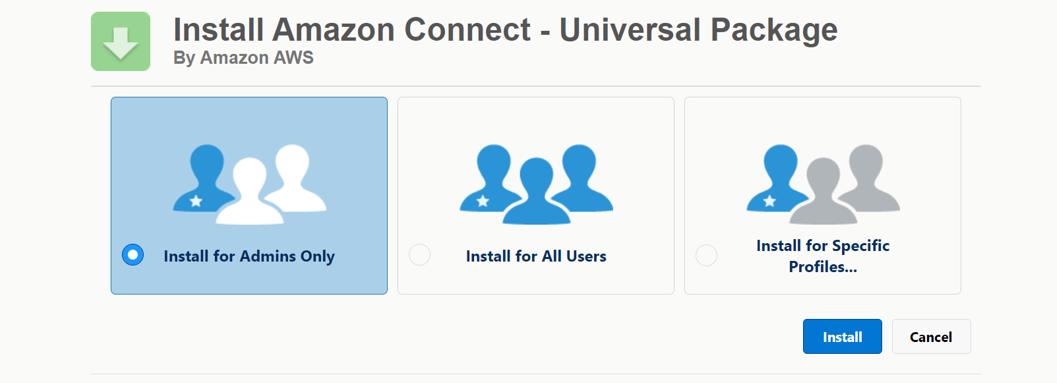
- Select Install for Admins Only, then click Install.
When the app is finished installing, you see a confirmation page and get an email to the address associated with your playground.
In a typical business scenario, you install for specific profiles to control who can use the CTI Adapter. You may also install in a Sandbox first, to ensure the adapter is configured and tested appropriately.
Great work! You installed the Amazon Connect CTI Adapter in your Trailhead Playground. But you’re not quite ready to place calls. In the next step, you connect our CTI Adapter to our Amazon Connect instance.
Configure a Salesforce Call Center
Configuring the Amazon Connect CTI Adapter
In this step, you switch between AWS and your Trailhead Playground, so keep both environments open and active in different tabs in your browser.
It’s time to connect your call center to your Amazon Connect instance!
Find Your Playground Domain
You start in your Trailhead Playground. First, record your playground domain so you can add it to the AWS access list later.
- In your playground, go to Setup.
- Copy the URL in your browser.
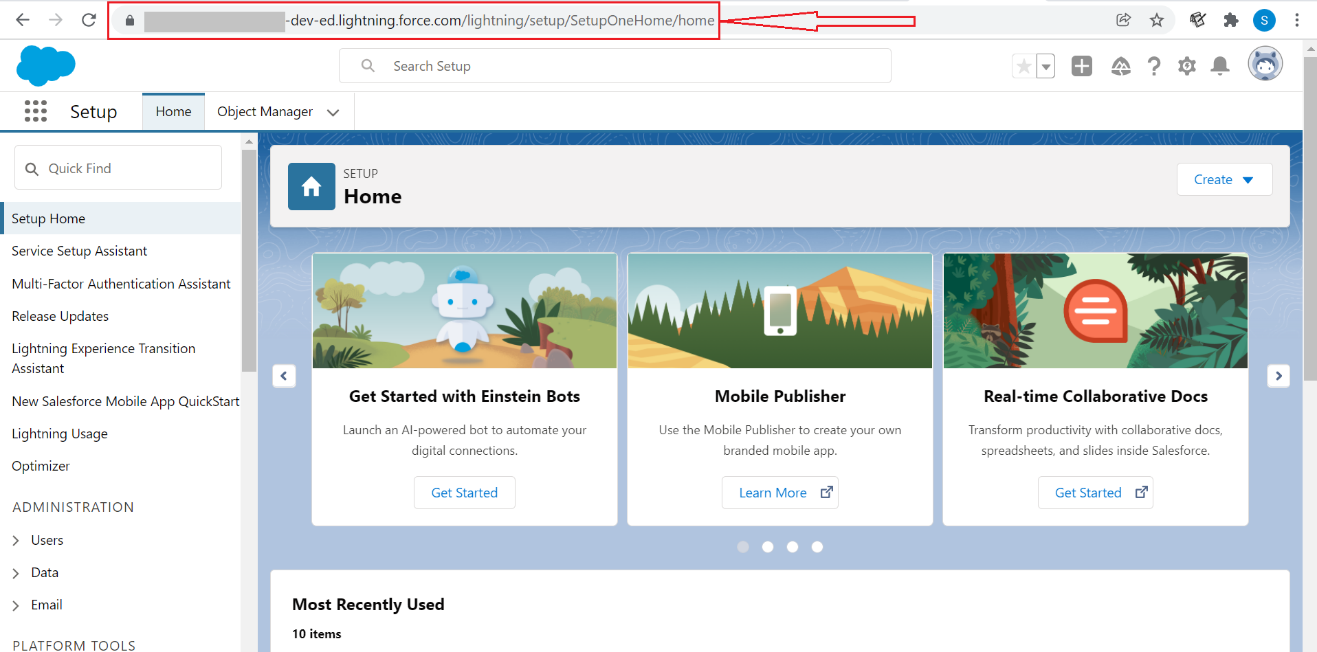
- Save your domain in a place where you can retrieve it later in this step.
- When you save your domain, it should start with the https:// and end at .com. So the domain you save should look like this: https://yourdomain-dev-ed.lightning.force.com
Find Your Lightning Adapter Domain
The package you installed in the previous step created a call center in Salesforce. Record the call center domain for the AWS access list.
- In Setup, enter visual in the Quick Find box, then click Visualforce Pages.
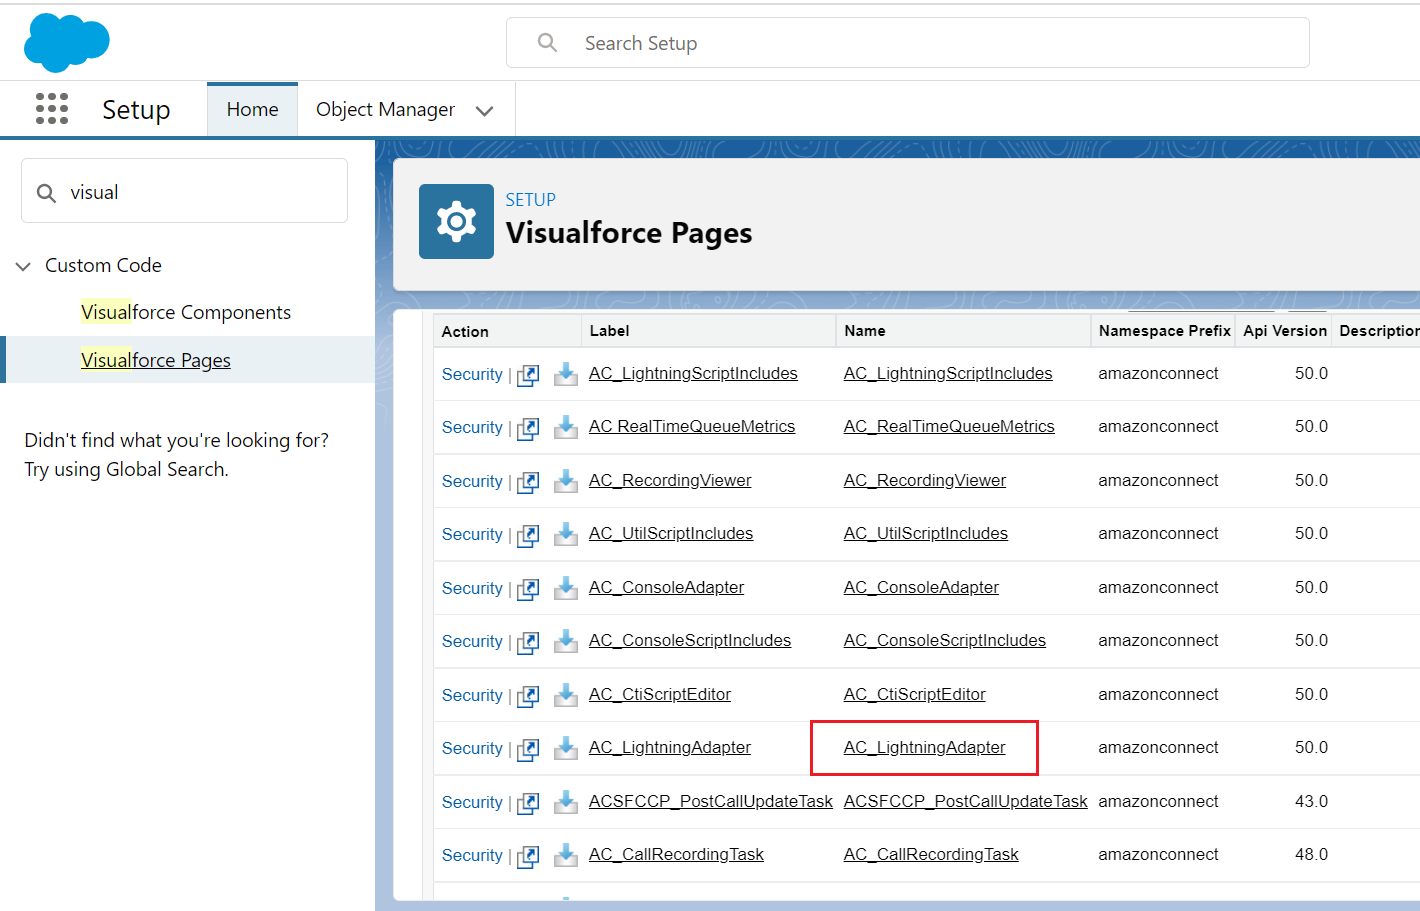
- In the Name column, click the AC_LightningAdapter link.
- Click the Preview button. A new browser tab will open with the URL of the Lightning Adapter page. It’s in this format: https://yourdomain-dev-ed–amazonconnect.visualforce.com/apex/AC_LightningAdapter. Copy the preview link URL and save it.
Configure Your Call Center
- Now go back to Setup and enter call in the Quick Find box, then click Call Centers.
- Click Continue, then click into your new call center, AC Lightning Adapter.
- Click Edit.
- In the CTI Adapter URL field, replace the current value with the Lightning Adapter URL you gathered above.
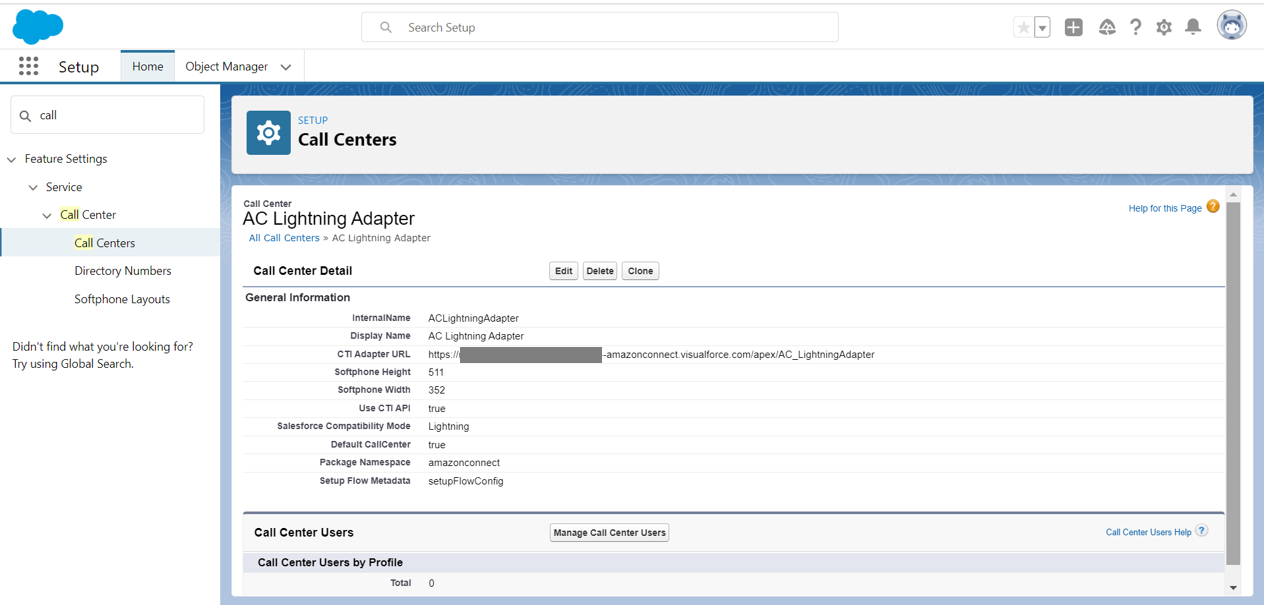
- Click Save.
Manage Call Center Users
Since you’ll be placing a call in this project, you need to add yourself as a call center user.
- In the AC Lightning Adapter Call Center setup page, click Manage Call Center Users.
- Then, click Add More Users.
- Set search criteria to find your own Salesforce user. Try:
- First Name | equals | the first name associated with your Trailhead account.
- Click Find.
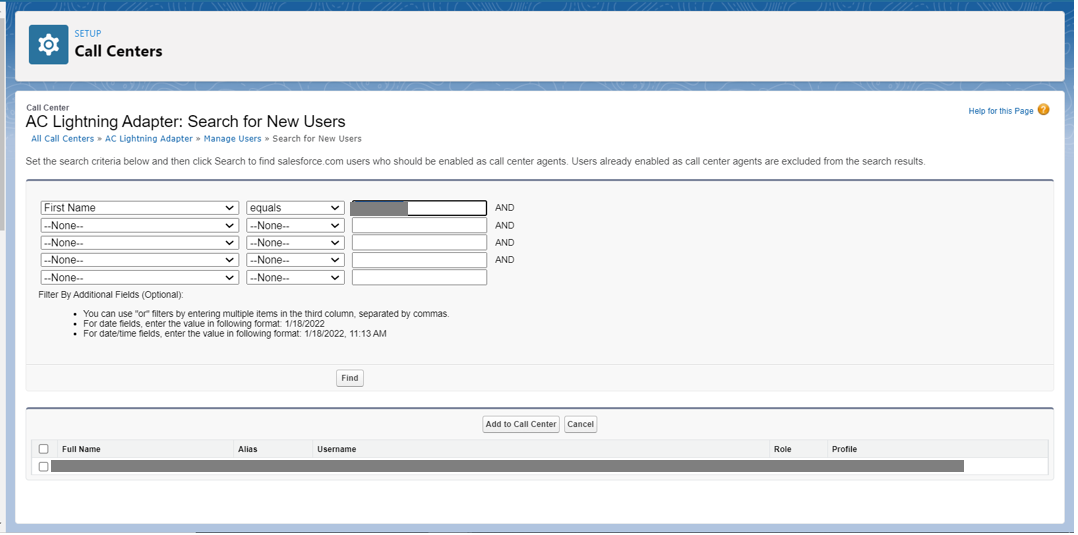
- Check the box next to your user name, then click Add to Call Center.
Now, assign Amazon Connect permission sets to call center users.
- In Setup, enter permission in the Quick Find box, click Permission Sets.
- Click AC_Agent in the Permission Set Label column.
- Click Manage Assignments, then click Add Assignments.
- Check the box by your name and any other users you wish, then click Assign.
- Click Done.
Great, your user is all set up! Now, it’s time to activate the phone in Service Console.
Activate Console Phone
To use the Contact Control Panel (CCP), you need to activate the console phone as a utility.
- In Setup, enter app manager in the Quick Find box, then click App Manager.
- Next to Service Console, click the disclosure triangle, and click Edit.
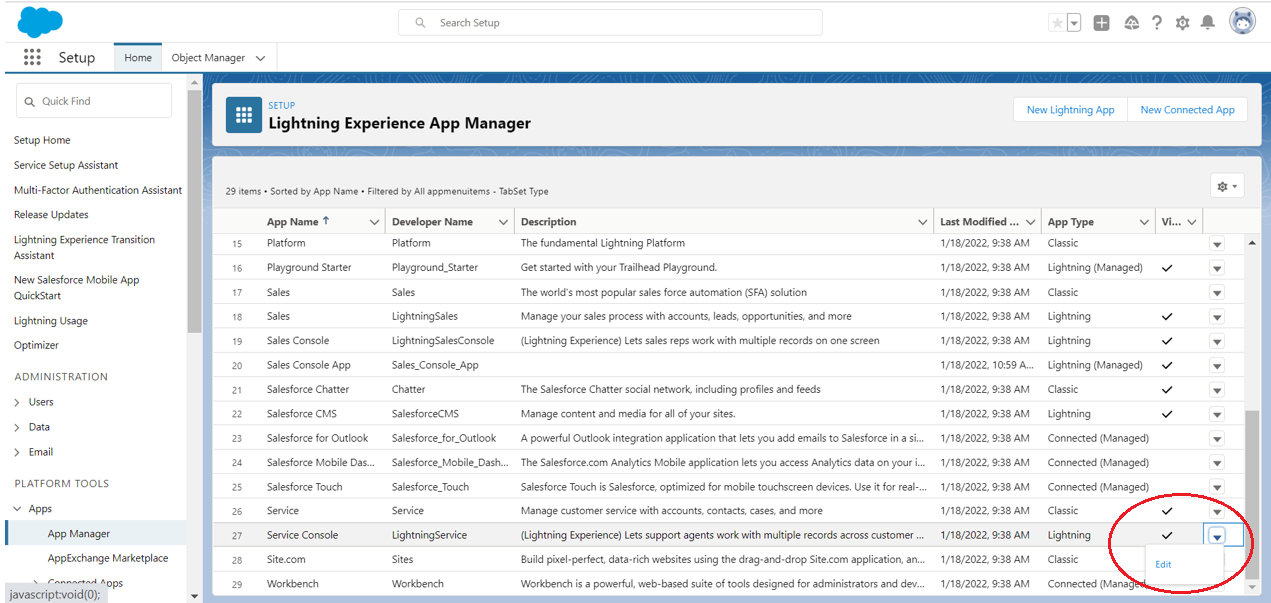
- In the Edit App screen, click Utility Items in the upper navigation bar.
- Then, click Add Utility Item.
- From the list of components, click Open CTI Softphone.
- Click Save, then click Back.
Add Amazon Connect CTI to Service Console
There are just a few more things to do to integrate your call center!
- Click
 to launch the App Launcher, then find and click Service Console. Since the phone utility has already been added, it will try to access Amazon Connect before your setup is complete.
- Make sure you allow pop-ups.
- If you see an error message in a new window, that’s OK. Close it. You’re well on your way to integration!
- In Service Console, click the disclosure triangle next to the current object, then scroll to the bottom of the dropdown menu and click Edit.

- Click Add More Items button on the Edit Service Console App Navigation Items screen.
- Select AC CTI Adapters and click Add 1 Nav Item.
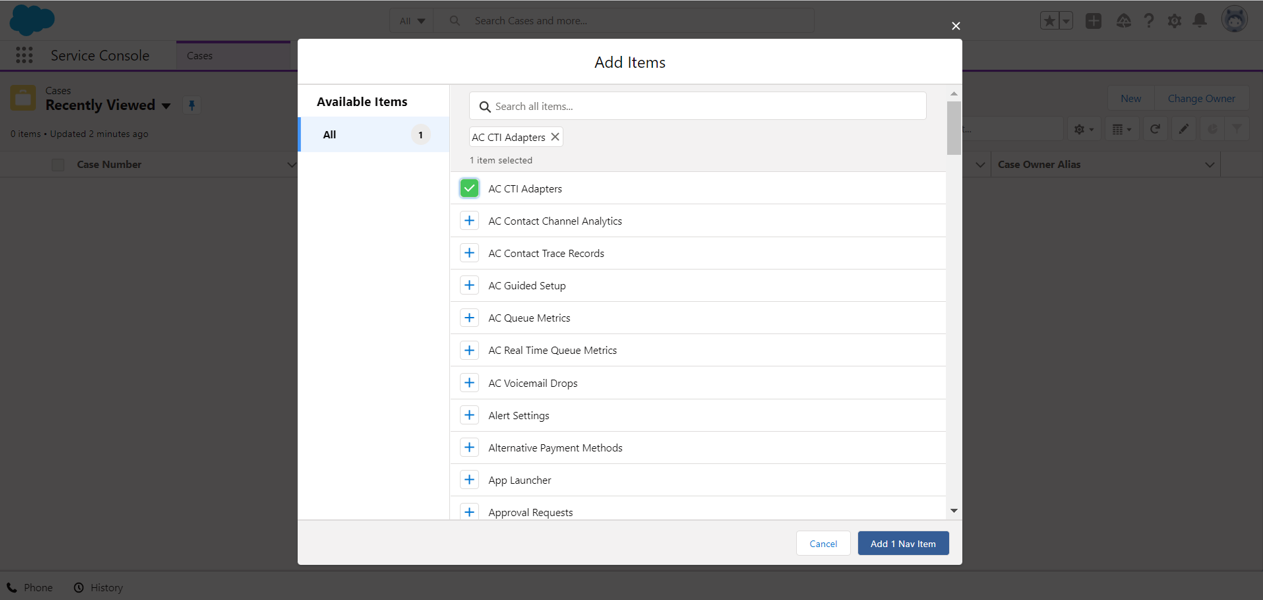
- Click Save.
- Back in the console, select the AC CTI Adapters from navigation menu.
- If Recently Viewed is selected, click on the drop-down and select All.
- Click on ACLightningAdapter. You make a change to this record to reference your Amazon Connect instance.
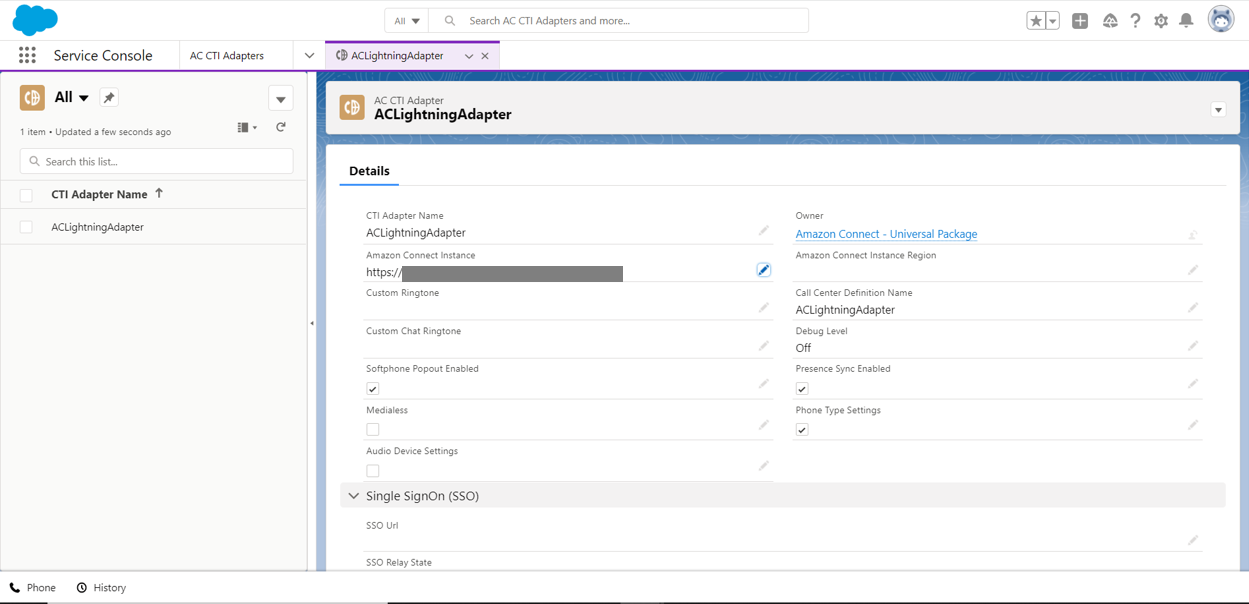
- Make sure your record has the following attributes.
- CTI Adapter Name: ACLightningAdapter
- Amazon Connect Instance: your Access URL
- If you need to retrieve your Amazon Connect instance Access URL, toggle back over to your AWS console and log in with your admin credentials.
- Enter amazon connect in the Find Services search bar and click Amazon Connect.
- Find and copy the Access URL related to your instance.
- Call Center Definition Name: ACLightningAdapter
- Check the box next to Softphone Popout Enabled and Presence Sync Enabled.
- Leave the rest as default and click Save.
Softphone Layout Setup
We want to open the contact record page for incoming call if there is a match phone number on a contact.
- In Setup, enter softphone in the Quick Find box, then click Softphone Layouts.
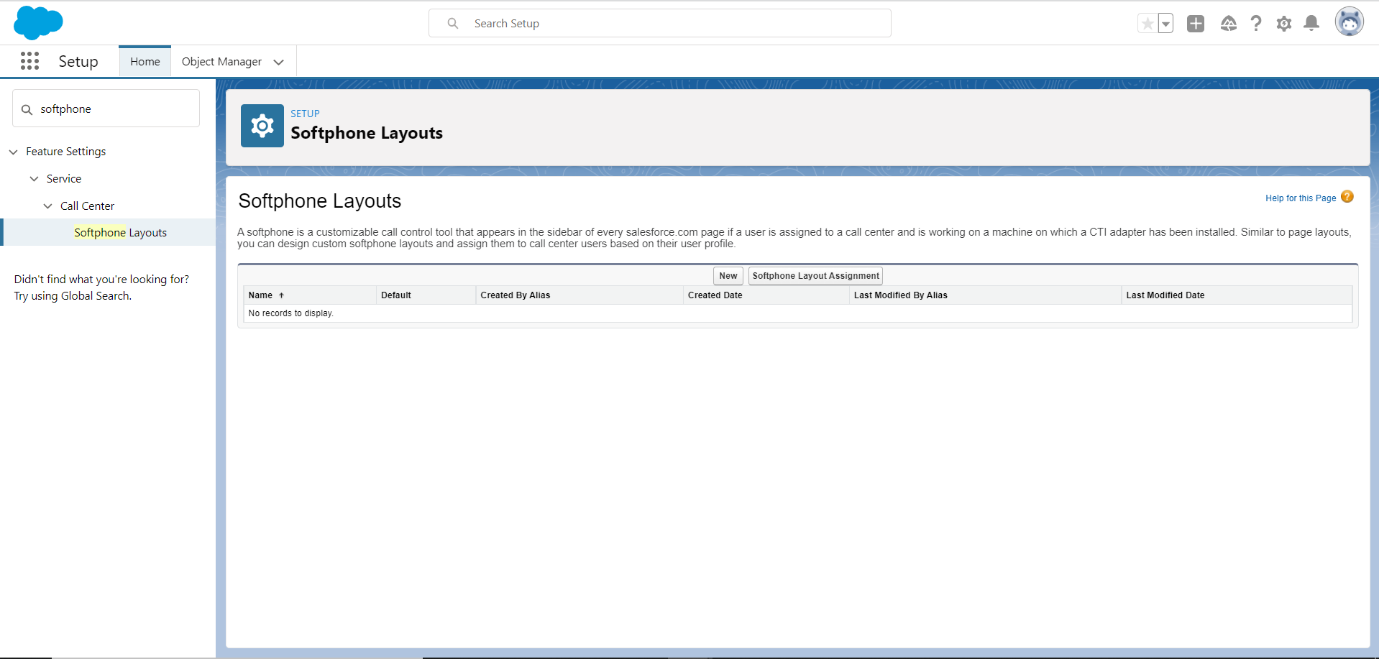
- Give a name for the softphone layout.
- Select Is Default Layout.
- Select Call Type Inbound.
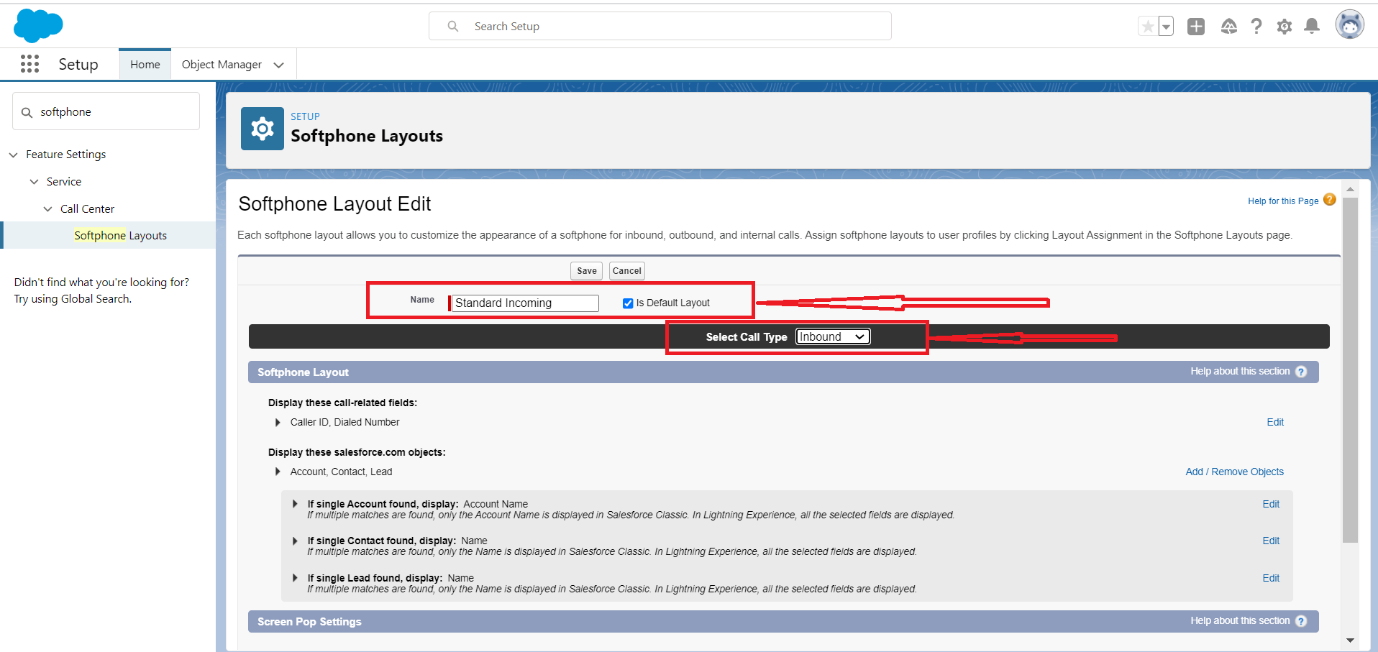
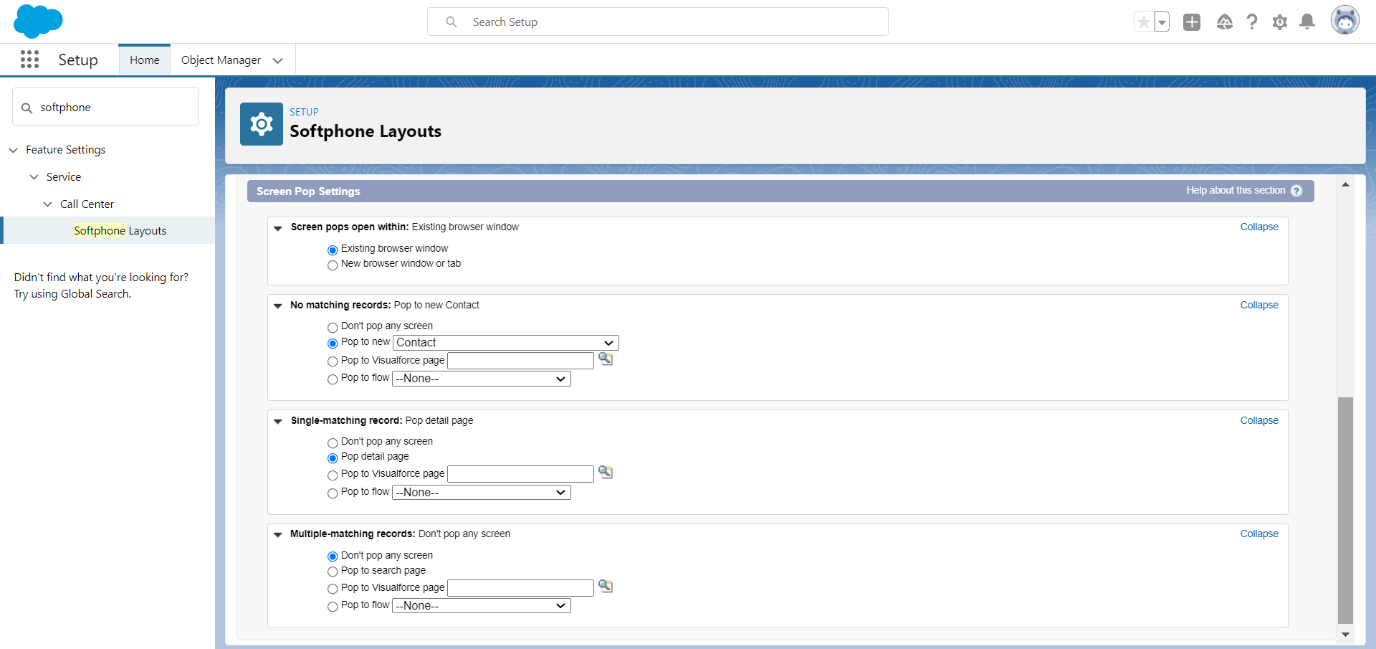
- Under Single-matching record select Pop detail page.
- Click Save.
Ensure Cross-Domain Access
Now it’s time to switch over to AWS. Ensuring cross-domain access is a security precaution where you put your Salesforce org on the Amazon Connect instance access list. Find more information in Amazon Connect Streams documentation. Switch back over to the AWS Console and log in with the email address you used for your AWS credentials if you haven’t already.
- Navigate to Amazon Connect and click your Instance Alias.

- On the left-hand pane, click Approved origins.

- In the main pane, click Add domain.
- Enter your playground domain so that it looks like this https://yourdomain-dev-ed.lightning.force.com
- Click Add.
Now, add your call center adapter domain.
- Click Add domain again.
- Enter your call center domain, then remove everything after .visual.force.com so that it looks like this https://yourdomain-dev-ed–amazonconnect.visualforce.com
- Click Add.
Everything is now connected properly and your Salesforce and Amazon Connect instances can work together. The next step is where the real fun begins: testing the integration!
Test the Amazon Connect CTI Adapter
Call Flow in the Salesforce Service Cloud
Back to your playground. Amazon Connect provides the telephony services used by the call center profile in Service Cloud. These services allow you to place outbound phone calls and receive phone calls directly in Salesforce.
In your playground, click  , then find Service Console. View any contact or account. Look for the phone icon next to the phone number.
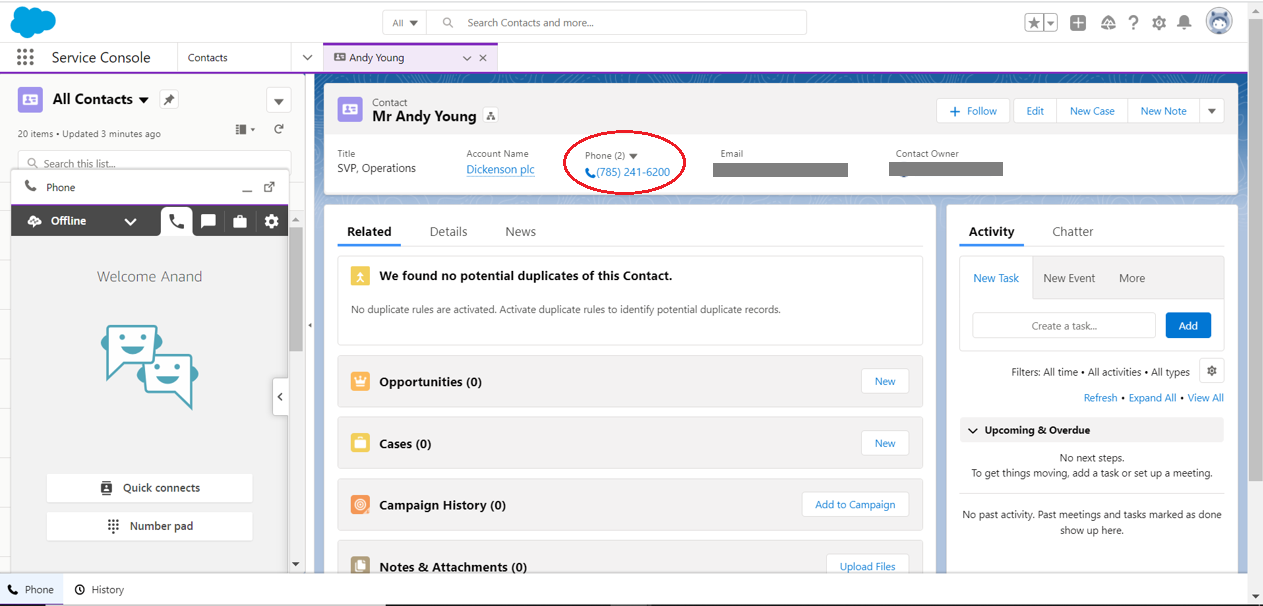
Sign In From Service Console
To make sure you’re connected, check the Phone utility.
- In your playground, click on the Phone utility item at the bottom of Service Console.
- If you see the CCP, you’re in! If not, you see a button to sign in.
- Click Sign in to CCP. This will open a pop-up screen prompting you to sign in to your Amazon Connect instance.
- Sign in using your Amazon Connect instance credentials.
Let’s make some phone calls.
Placing an Outbound Phone Call
In your playground, create a new contact with a phone number where you receive calls, such as your mobile number.
- From the Service Console, click the disclosure arrow to the right of Service Console in the navigation bar and select Contacts.
- In the upper-right-hand corner of the Contacts tab, click New.
- Enter an contact name and phone number.
- Enter a phone number where you receive calls, such as your mobile phone number.
- Click Save.
On the contact page that appears, you see a phone icon next to the phone number. Note: It may take 15-20 minutes for the icon to propagate. If the phone widget shows an error, wait a minute or two and then refresh the page.
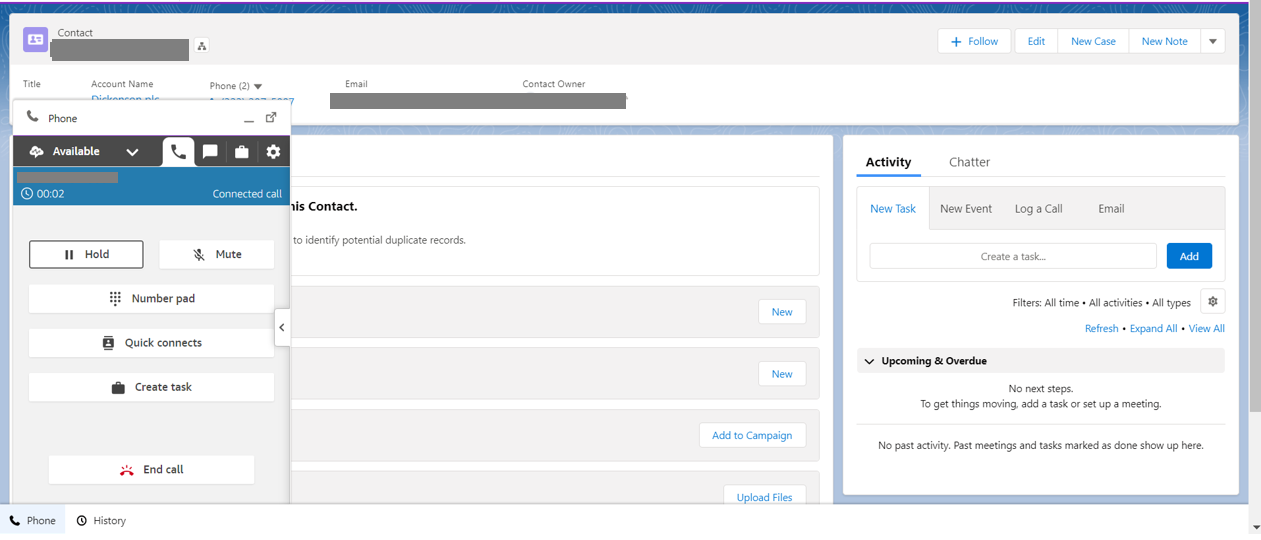
Place a Call in the Service Console
- Click the phone number for the account to make an outbound call. The CCP is the same one you used in the Amazon Connect configuration, providing you with a simple and consistent interface.
- Answer the phone call and make sure it’s connected.
- Click End Call.
Once you complete the call, the Amazon Connect CCP goes to AfterCallWork status, where you can perform follow-up activities, such as logging the call and follow-up tasks. Click Clear contact after completing any activities to mark your status as Available, ready to take more calls.
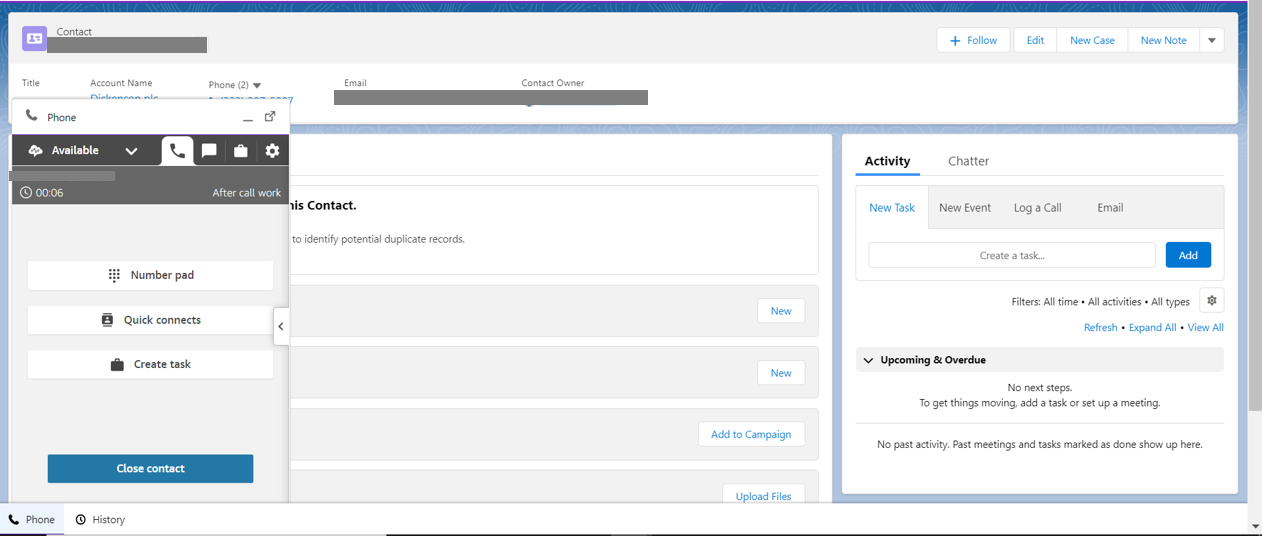
Receiving an Inbound Phone Call
The most important aspect of any contact center is call handling, and Amazon Connect is very efficient at handling calls. If an available agent receives a call, the Amazon Connect CCP appears and opens any records that match the caller ID.
Let’s test receiving an incoming call.
- In the CCP, make sure your status is set to Available.
- From another phone, place a call to the phone number you configured for your Amazon Connect instance.
- Follow the voice prompt and press 1 for an agent.
- Press 1 to move to the front of the queue.
- Press 1 once more to be connected.
- Back in the console, click the Check Mark button to accept the call.
- You can see the contact record page will be opened after accepting the call.
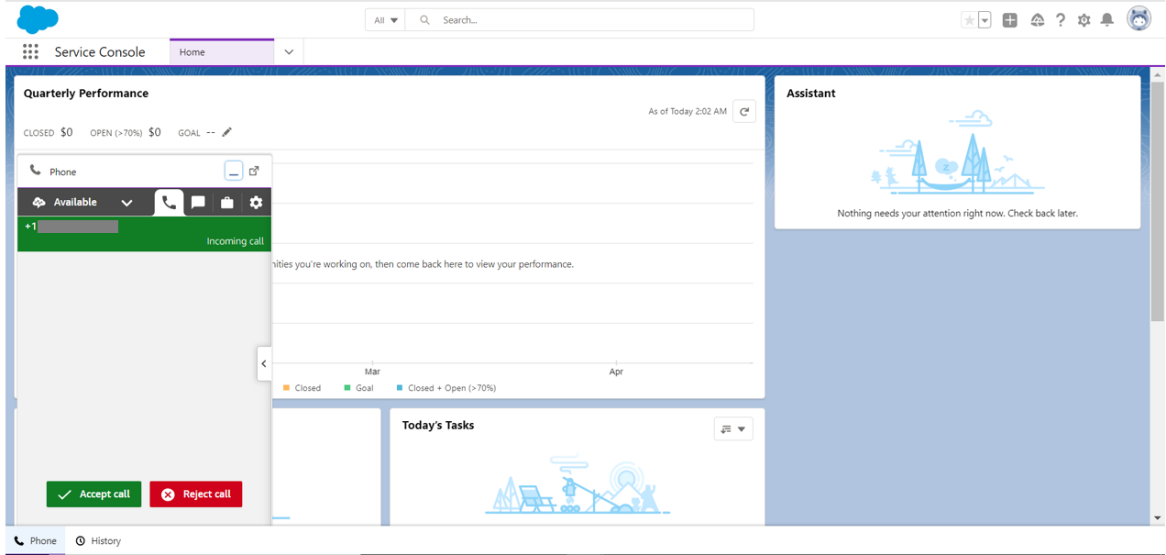
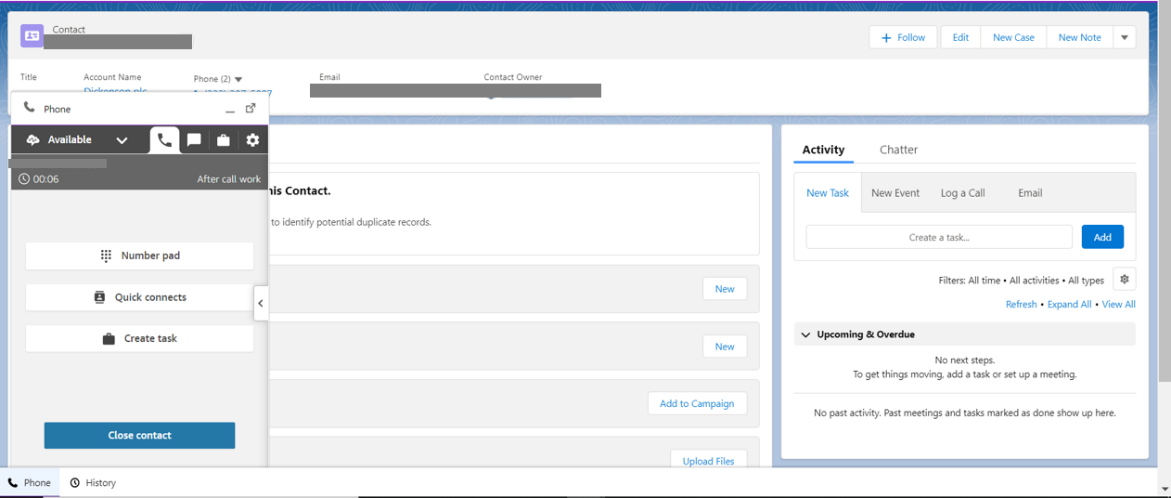
- You can see the contact record page will be opened after accepting the call.
- Once connected, click End Call.
Congratulations! You set up a call center with Amazon Connect and Salesforce Service Cloud. During this project, you learned:
- How to set up and configure Amazon Connect.
- How to set up and configure a Call Center in Salesforce with Amazon Connect.
- How to use the Contact Control Panel in Salesforce.
You’re almost finished. For this project, you claimed a phone number that is free for a specific period of time. To ensure you don’t get charged in the future, release it back to AWS.
Release Your Phone Number Back to AWS
- Log back in to AWS at https://aws.amazon.com/
- Navigate to Amazon Connect by entering amazon connect in Find Services.
- Click on your Amazon Connect instance.
- Then click on the Login URL, this takes you to a login page for your Amazon Connect instance.
- Sign in with your Amazon Connect admin credentials.
To release the phone number, you first have to remove it from BasicQueue.
- In your Amazon Connect instance, click Routing, then Queues.
- Select BasicQueue.
- Under Outbound caller ID number, click x next to your claimed phone number to remove it.
- Click Save.
Now, you’re ready to release the phone number.
- Click Routing, then Phone numbers.
- Check the box next to your claimed phone number.
- Click Release.
- Then, click Remove.
You should now have no phone numbers related to your Amazon Connect instance.[/vc_column_text][/vc_column][/vc_row]


